GRAZIA CASA DIY

ASK THE EXPERT
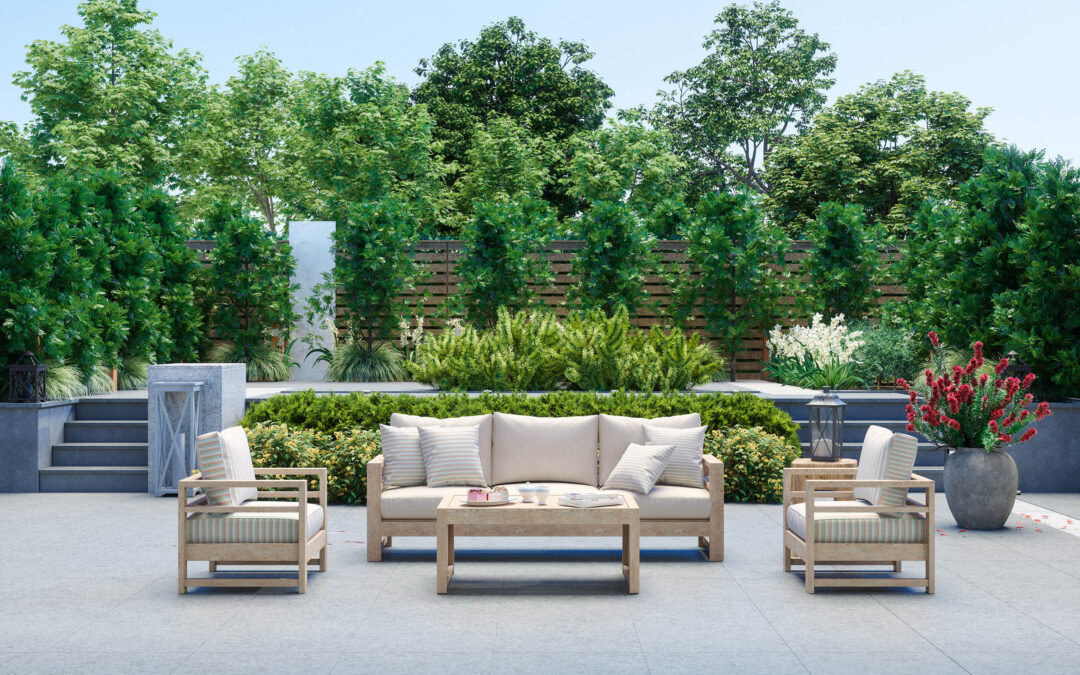
HOW DO I TRANSFORM MY OUTDOOR SPACE?
Create an alfresco living space, says Wickes category director Chris Moorhouse
The days are lengthening and the sun is getting warmer, so it’s time to give your outside space an update. Whatever its size, there are things you can do to transform it quickly and easily into somewhere that looks and feels great.
Let’s start with decking. It’s great for creating a flat surface for seating or dining and is a brilliant solution for sloping ground. Or turn it into seating with built-in benches that are ideal for small or courtyard spaces. There are lots of options to choose from, whether soft or hard wood, as well as composite decking that is low-maintenance.
Somewhere to sit and enjoy the sunshine is a must. Bijou? Go for one or two statement garden chairs. If you have more space, create an outdoor living room by adding a sofa. A dining table and chairs is another great addition. Even in summer, evenings can be chilly. A fire pit creates a cosy ambience as well as keeping you warm. If you can’t have an open fire, add warmth with an outdoor heater. Both extending the time you can be in your garden into the autumn.
A shelter, whether from the sun or light rain, is another essential. Parasols are perfect for small spaces. A canopy that can be retracted is a great way to create an undercover patio space by the house. Further into the garden, a gazebo creates a garden room and can be as simple or as luxe as you like. Or go Med-style with a pergola that, over time, can be covered in fragrant climbers.
Don’t forget lighting. Solar lights are hassle-free as you don’t have to worry about electric sockets. Drape string lights across a balcony or wrap them around trees to create atmosphere. Glow up further with solar lanterns – faux rattan-style for a boho look, in a sleek metallic finish or even Moroccan-inspired. Magical.

INSIDER KNOWLEDGE
DO THE PREP TO GET YOUR FLOORING RIGHT
By Wickes category director Paul Bangs
■ Measure the length of all the walls in the area that is to have new flooring. Using an online flooring calculator, input your room dimensions to work out how many packs you will need.
■ Look into your flooring options before you make a final decision. Are they suitable for the type of room? Consider moisture, pets and sunlight. For kitchens and bathrooms, always opt for water-resistant flooring.
■ Ready to lay your floor? Make sure you have all the equipment you will need. This includes spacer wedges, a jigsaw or handsaw, a tapping block, hammer and ruler. You may also require a skirting board, door threshold or colour-matched edging trims to complete your project.
■ Make sure the sub-floor surface is level, dry and clean. It’s a good idea to use an underlay unless one is already fitted, as this will help improve acoustics and sort out minor sub-floor imperfections. For any installations over underfloor heating, however, check with a qualified expert before going ahead.
■ All laminate, wood and luxury vinyl will expand and contract due to a room’s temperature and moisture fluctuations. To allow for this, follow the expansion gaps recommended on the packaging.
■ Keep the flooring in good condition by looking after it according to the manufacturer’s recommended conditions. Also use felt pads under chairs and heavier pieces of furniture.

KNOW YOUR PAINT FINISHES
There are so many different types, but which is right for your project?
Matt: for interior walls and ceilings, this has a flat, modern finish that’s good at hiding imperfections. However, it is not as durable as silk, so it’s best used in low-traffic areas, and not in kitchens or bathrooms as it’s not good with moisture.
Vinyl silk: a high-sheen look that can make a room feel lighter and larger as it bounces the light around. More durable than matt, it can be wiped clean, so it’s suitable for high-traffic areas and kitchens, but not bathrooms.
Durable emulsion: mid-sheen and with a tough finish, this is suitable for high-traffic areas such as hallways, as you can wipe away marks without spoiling the finish. It also has high moisture-resistance so is great for bathrooms.
Kitchen emulsion: formulated for the busiest room in the house, it’s scrub-resistant so can cope with stains and marks. With a low-sheen finish, use it on walls and ceilings, as well as in utility rooms.
Bathroom emulsion: with a mid-sheen finish, this has been made to withstand moisture and mould. When it gets steamy, simply wipe the walls dry.
Eggshell: this is for wood and has a soft, low-sheen finish similar to the surface of an egg, hence its name. It gives a room a soft glow but is hard-wearing.

DIY MASTERCLASS
PICTURE PERFECT
Art transforms a room into a characterful space. Here’s how to hang a picture so it looks just right
Before you begin, make sure you have the right equipment – a pipe and cable detector, a hammer, pencil and the right fixing for the wall and weight of the picture. For a plaster wall, use a picture hook; for masonry walls, a drill insert wall plug and screw; for a stud wall, a screw into the timber frame or, for the hollow area, a hollow wall anchor.
How far up the wall should your art hang? As a rule of thumb, the middle of it should be at roughly eye level, about 1.4-1.5m high. If you’re hanging a single piece, the middle of the wall (calculated from either end) is the best position. However, if it’s above furniture this may need to be tweaked. If it’s above a sofa, for example, make sure your head does not hit the frame when you sit down!
Once you’ve decided on the position, use the detector to make sure there are no water pipes or electric cables in the wall where you want to put the hook. This is crucial to avoid expensive mistakes, so don’t just hope for the best! If none are detected, hold the picture in place and use a pencil to lightly mark on the wall where the top centre of the picture is.
Next, flip the picture over so you can see the hanging wire or cord. Make sure it is taut. With a measuring tape, measure the distance from the top of the frame to the apex of the wire, then add on a few millimetres. Now, on the wall, measure the same distance up from the frame mark, and make a new mark. This is where you will fix the picture hook (the extra millimetres will hide the original mark).
Fix the hanging mechanism (if a hook, the mark should be where the hook is), and hang your picture.
For a video and more expert advice on hook types and tools, visit wickes.co.uk/how-to-guides/decorating/hang-a-picture

TILE TIPS
EVERYTHING YOU NEED TO KNOW ABOUT CHOOSING TILES
Whether plain or patterned, tiles will transform a room but, like any decorative surface, you need to use them in ways that enhance a room rather than diminish it.
First, think scale. Large tiles in a small room give the illusion of space, as fewer grout lines create a seamless look. Smaller tiles work well in small areas, such as showers and kitchen splashbacks. The more grout lines there are, the greater detail for a stylised look. Using a mix of sizes can add extra interest, such as smaller tiles on shower walls and larger ones on the floor. For example, team the grey, white and blue Wickes Boutique Atwood Patterned Matt Ceramic Wall & Floor Tile with plain white metro tiles on the wall.
The way you lay the tiles is just as important. Laid diagonally – or herringbone – makes a room appear larger. To make a narrow room seem wider, use rectangular tiles and lay the longer edge against the shorter wall.
Finally, matching the grout to the tiles will accentuate the sense of space, while grout in a contrasting colour creates a graphic, eye-catching look.
FIVE WAYS WITH…
PANELLING
Panelling is perfect for giving a wall a fabulous new look. These are the different options…
1 – Shiplap: Tight-knit horizontal boards that are grooved so they interlock to create a clean, crisp line. Opt for a natural wood grain for a classic look. For a more contemporary style, choose white or grey.
2 – Tongue and groove: Similar in look to shiplap but vertical and with an interlocking system that slots together. Easy to paint, use it on the lower half of walls. Above, opt for a contrasting colour or wallpaper for an injection of pattern.
3 – Shaker: This classic style features wider boards placed against each other at an angle to create a series of rectangles. A great way to add character is to apply it to the lower half of walls and paint it a darker shade to the wall above. Available in kit form from Wickes.
4 – Grid: This Jacobean-influenced style is hugely impactful and, when used on just one wall, will elevate a dull room. It too comes as a kit from Wickes, making it super-easy to install.
5 – Slatted: This has a cool Scandi look. Use it in the bathroom or behind a bed. Find oak panels in a variety of natural shades.